I've been doing this for awhile now. Its really easy. I happen to be a syrup snob. Pure maple syrup straight from the tree is the only kind I will buy. Its a total indulgence and a major splurge, but, like butter, some things just aren't meant to be substituted. However, when I can't bring myself to spend $20 on a little bottle of syrup that will last me two, maybe three batches of pancakes, I make what I consider to be the next best thing. I'm still trying to perfect the recipe but this one has served me well, so far.
"Maple Syrup"
2 c. granulated sugar
2 c. water (filtered or bottled is best)
2 tsp. maple extract
Add all ingredients to a medium sauce pan and bring to a boil. Reduce to simmer for 10 - 15 minutes. Let cool to room temperature before serving.
I have had to play around with the simmer times quite a bit, but so far, I think 10-15 minutes is good for developing a reduced consistency that most closely resembles that of actual maple syrup. If you find that your syrup begins to crystallize or solidify at room temperature, just add a few tablespoons of water to the pot and stir it in until it is resumes its liquidity (I just made up that word). Keep adding water until you get the consistency you're after. Remember, while the syrup is warm it will be much thinner than at room temp. so if you're checking for consistency while you're simmering then you'll have to account for that. If you find that even at room temperature the syrup is too thin, just let it simmer for a few more minutes to reduce it down.
This is a great alternative to shelling out big bucks for the real stuff, and tastes so much better than the imitation products! Give it a try sometime.
#9 Save those scraps!!!


#8 Easy clean your stove top grill
You know, the cast iron ones with the grill lines on one side and the flat griddle on the other? If you have one of those, then you know, that as lovely as it is to be able to achieve grilling perfection indoors in times of inclement weather, it is equally painful to have to deal with scrubbing the charred surface clean.

What I have figured out, is that clean up becomes very simple if you can remember to do one thing. As soon as the food is off the grill, as soon as you turn the heat off, very slowly and carefully pour water onto the surface of the grill.


#7 Make your fresh flower bouquet last longer.
So my husband surprised me with flowers a couple weeks back and I was thrilled! I immediately began taking pictures to mark the occasion.


Why should I look at a bunch of dying flowers until they are completely crsipy? The only reason I hadn't thrown them out yet was because I was waiting for the absolute last flower to dry up before I could will myself to part with them. I decided to save the ones that were still viable and make a smaller bouquet out of them and threw their dead and crispy neighbors out!


#6 Make your own brown sugar!
I was planning to make cookies one day when I discovered that I was out of brown sugar. Running to the store wasn't an option, at the time, and I REALLY wanted those cookies!! I remembered that I had a some molasses left over from making gingerbread cookies during Christmas... hmmm.... So I looked up the recipe, and sure enough - just add molasses to white sugar and stir like crazy.


Brown Sugar Recipe
2 cups white sugar
1 1/2 tbsp molasses
Combine in a large bowl and mix until texture is even.
#5 Have some stale bread? Don't waste it! Repurpose it! Cut it into cubes, in a large bowl, combine the cubed bread with some salt, pepper, a little parsely or thyme and some olive oil. Give it a quick toss and put them in a single layer on a large baking sheet. Bake for 10-12 minutes at 350 degrees and you have homemade croutons!


#4 Peeling Hard Boiled Eggs
Have you ever boiled eggs with the intention of using them for later? So you put them in the fridge, shell on (so as not to unnecessarily stink up your kitchen), and then when you try to peel the cold eggs later, you not only remove the shell, but also about 1/2 of the white part with it. That's because cold eggs don't peel well. Warm eggs peel very easily. Here is my solution: boil your eggs and peel them as soon as they're cool enough to handle. Put them into a plastic storage container and fill it up with cold water. Place the container in the fridge.

#3 Medicine Charts
Some kids don't like taking cold medicine. Mine LOVE taking cold medicine. They're weirdos. I think it makes them feel important. They get to do something special that no one else in the family is required to do (unless they are also sick). At least that's the impression I get. Or maybe cold medicine just tastes better nowadays. What do I know? I do know, however, that remembering to give my kids thier full regimen of antibiotics can be a challenge. Sometimes I forget. Sometimes they don't like the taste of it. Sometimes I don't feel like fighting about it. So I devised a system that helps me remember and even gets the kids to remind me that its time to take thier antibiotics.

I make a chart with the number of days their regimen will last and the number of times they will take it each day. We currently have two ear infections going on. They were both prescribed the same antibiotic that they are to take three times a day for ten days. Ugh. I decided that giving it to them after meal time is the best way to remember to take it, so I assigned three rows: B for breakfast, L for lunch, D for dinner. Easy. Every time they take their antibiotics, I let them make a big fat X in the corresponding box. And the kicker...they get to use a pen or a sharpie to do it. That makes all the difference. Ink is a big 'no-no' around here so they get to do something that would otherwise be forbidden... and they eat it up. They are sure to remind me to administer the drugs.

Works like a charm.
#2 Freezer Meals
Making a lasagna or other labor intensive meal?


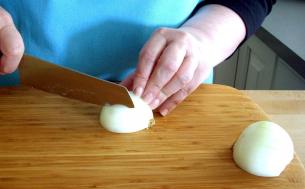
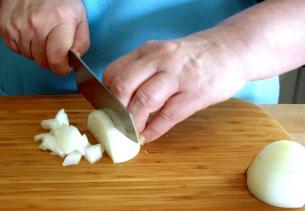
#1 Cutting Onions
Have you tried this?
And FAILED???
Ya, me too. Why? Because it takes a really sharp knife to get through that onion without having to saw your way down to the cutting board. Forgive me if I forget to sharpen my knives every Saturday. I have laundry to do.
Here's another way to get the same results with a less than sharp knife.
Cut a few imperfect slices of onion.


Please forgive the terrible pictures. My kitchen has horrible lighting.
are those your chunky fingers??? lol
ReplyDeleteno.... You know I have skeleton fingers.
ReplyDeleteI love the Medicine Chart. My daughter hates taking her medicine....but she does love charts and stickers! I think it might work!
ReplyDeleteI had no clue about the brown sugar....!